Additional Salesforce Requirements and Setup
Configuring Salesforce to launch the PowerDialer Sidebar, enable Call Center, optimize page layouts and more for your Call Team
Overview
After you install and authorize PowerDialer for your Salesforce organization, there are a few other changes you can make to make use of all the tool’s features. Making the modifications isn’t hard, just follow the steps below.
Add the PowerDialer Side Panel
Turn on the PowerDialer side panel to improve your team’s productivity. Once you’ve completed the following steps, your users will see the PowerDialer sidebar.
To Add the PowerDialer Side Panel
- On the upper right of your Salesforce screen, click Setup. This will take you to the backend of Salesforce
- Locate the Customize drop down menu on the left side in Setup. From here, you can make changes to pre-existing elements in Salesforce
- Locate User Interface and then click the checkbox for ‘Show Custom Sidebar Components on All Pages’
Add Users to the Click-to-Call Panel
Uh oh, is there a License not Authorized message on your sidebar? This can be solved by adding your appropriate users to the Call Center. Let’s get that set up now.
To Add Users to the Click-to-Call Panel
- Return to the Setup link and click it to return to the Salesforce back end
- Head back to the Customize drop down menu as you did before.
- This time choose the option Call Center
- Choose All Call Centers
- Click the link InsideSales.com | Click-to-Call
- In the top right, please click the Manage Call Center Users button
- Here, you will add your users to the Call Center. This is also where you go to remove them if necessary, using the Remove Users button.
- Click the button Add More Users
In this area, you can use the filters to find the users you need to add. For example, you can choose ‘Active’ as a criteria and ‘equals’ ‘True’ to show only users that are indicated as ‘Active’. A second filter, such as ‘Role’ or ‘Profile’ can help you narrow your search even more.
To add the users you found, just click the checkboxes beside their name and click the Add to Call Center button. This adds each one you checked to the users list – no one-by-one adding!
Add the Call Center to Your Users’ Profiles
At this point, you have navigated to a Call Center and found the Center: InsideSales.com | Click-to-Call. This is the Center you just added your users to. Now it’s time to add the InsideSales.com | Click-to-Call Call Center to your user’s profile.

To Add the Call Center to Your Users’ Profiles
- Still in the Setup back end area of Salesforce, click Manage Users on the left side of the screen
- Click Users.
- Click one of the users that will be added to the Call Center. Remember that they must be added to the Call Center as discussed above
- Once in the ‘User Detail’ page, click the Edit button
- Scroll down and look on the right-hand side. There will be a field named ‘Call Center’
- Type in the name of the Call Center, or if you don’t remember the name, type the beginning letters into the field and click the magnifying glass icon next to the field to search and select the correct one
- Scroll back up and click the ‘Save’ button
Congratulations! You have now added the first user to your Call Center! They will now see the PowerDialer panel and all its functions. No more ‘License not Authorized’ message!
Repeat these steps for each of the users you added to the Call Center.
Add Home Page Components to the PowerDialer Sidebar
From this point, there are even more options you can customize to enable even more productivity for your users. You can add home page elements to the sidebar as well as page and task layouts.
To add home page components to your PowerDialer sidebar:
- Click Setup, then the Customize dropdown on the left side of the screen, click Home for a second dropdown menu, and finally Home Page Layouts. Best Practice – It is recommended to create (or clone) a new page layout for the specific users/profile who will be using InsideSales and give it a clear name. This way you won’t accidentally allow access to the wrong user
- Click Edit to see the options that you can enable for the sidebar. Choose which will be the most beneficial to your users. You can always return here to change anything in the future. Best Practice – If your users will be using the PowerDialer interface, you should click the Insidesales Power Tools option, so they can use the quicklink to jump to the PowerDialer panel. If they are not, please leave this unchecked
- Click Next to continue
- The next step is to ‘Order the Components’. Here, you can arrange the enabled elements on the sidebar to best fit your user’s needs. Use the ‘Top’, ‘Up’, ‘Down’ and ‘Bottom’ buttons to shift the component’s position. You can even view a preview of the component arrangement to make sure it is just right
- Choose Save if this sidebar is already assigned on the layout to the correct profile or Save & Assign if you still need to allow a profile to access the new layout
Add InsideSales.com Fields to the User Page Layout
Let’s add more fields to the ‘User Page Layout’, ‘Task Page Layouts’ and ‘Search Page Layouts’ to make your user’s day even easier. From this layout screen, you can drag-and-drop any fields you would like from the top options in the grey box or drag fields that already exist to different places on the layout.
To add InsideSales.com Fields to the User Page Layout
- Navigate to your Setup link (you’re becoming a pro at this!).
- On the left-hand side in the Customize section, dropdown the Users menu
- Click the Page Layouts option
- Choose the User Page Layouts section and click Edit next to ‘User Layout’, or which user page layout you would like to edit
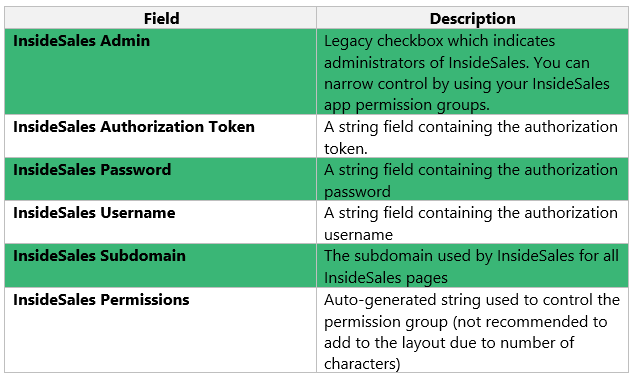
Fields Available for User Page Layout
The fields you can add to your ‘User Page Layout’ are listed in the table below:
Add InsideSales.com Fields to the Task Page
Now let’s move on to adding InsideSales.com fields to the ‘Task Layouts’. Just as you did for the user layout, just drag and drop the fields into the page layout where you would prefer them. Create a new InsideSales section for convenience. These are great fields for tracking data that can be used in reports.
To Add InsideSales.com Fields to the Task Page
- Find and click Setup
- Locate the Customize section
- Click the dropdown menu for Activities
- Now click Task Page Layouts
- Choose which layout you would like to add the fields to and click edit
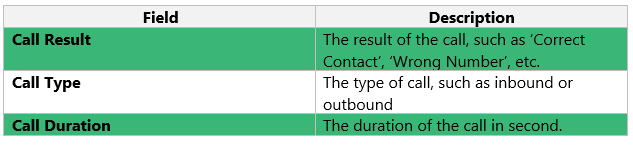
Standard Fields Used by PowerDialer
These are standard fields in your Salesforce instance that are used by InsideSales.com:
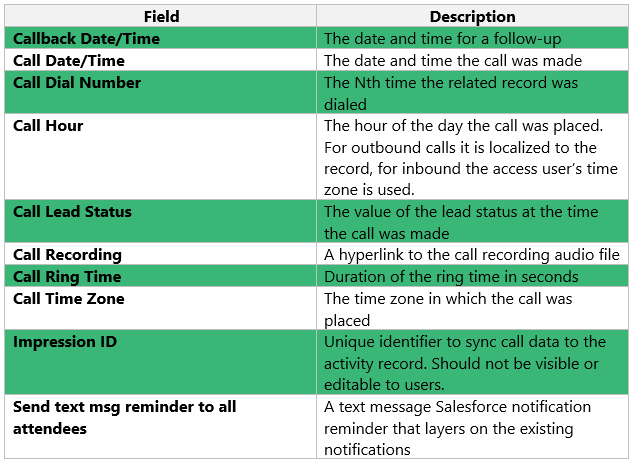
Custom Fields Created by PowerDialer
InsideSales managed fields that were created upon installation into Salesforce:
Optional Task Fields
The below fields are optional and must be created manually. For them to work correctly, the API names must match the InsideSales.com field exactly as it is demonstrated below.

To get to the Activities custom fields screen:
- Navigate to Setup
- Look for Customize on the left side of the screen
- Choose Activities dropdown
- Look for Activity Custom Fields and click
- To create the new field, click the New button
Add Manage List Button to your Search Layout
Now, creating a list and using the ‘Manage List’ buttons for your search layouts is just as simple as all the above.

To Add Manage List Button to your Search Layout
- Navigate to Setup
- Look for Customize on the left side of the screen
- Choose Leads dropdown
- Look for Search Layouts and click
- Now choose Leads List View
- Click Edit
- Move the ‘Create List’, ‘Manage Lists’ and ‘Launch Click-to-Call’ in the ‘Available Buttons’ box to the ‘Selected Buttons’ box
Add Manage List Button to Specific Objects
You can follow these steps for each object you’d like to add the buttons to, such as ‘Account List’, ‘Contacts List’, ‘Cases List’, etc.
To add these fields to the ‘Leads,’ ‘Contacts,’ or ‘Accounts’ objects, follow these steps:
- Navigate to Setup
- Look for Customize on the left side of the screen
- Choose the dropdown for whatever object you are working on
- Look for Page Layouts and click
- Choose the specific layout you want to modify
- Drag and drop the desired field(s) to the layout just as you did when you changed other page layouts
